One small project, from first stitch to finish
Finish your first small cross stitch
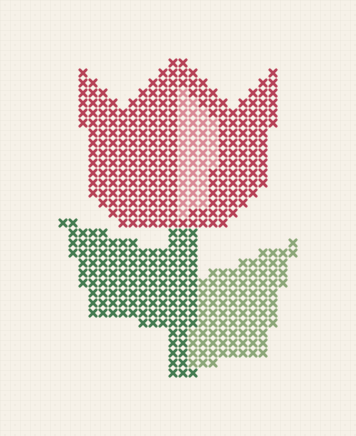
Pocket Tulip: four colors, whole crosses and a clear place to begin.
Start with one manageable design. Practise the chart once, then follow the stem, leaves and flower in six stages. Take as many sittings as you need.
458 stitches · 4 colors · 32 × 40 chart squares
Includes symbol charts, DMC list, thread estimates and illustrated hoop finishing. PDF measurements are in inches. For other cloth counts or settings, open the pattern.
Gather a small, complete kit
- 14-count working cloth
- 8.50 × 9.00 in
21.59 × 22.86 cm - Stitched design
- 2.29 × 2.86 in
5.81 × 7.26 cm - Needle and floss
- A tapestry needle and two separated strands of six-strand cotton.
The working cloth includes the handling and finishing allowance. Keep it attached while stitching. Measure actual supplies and try the layout before cutting.
- A · DMC 326 Very Dark Rose
- B · DMC 3354 Light Dusty Rose
- C · DMC 367 Dark Pistachio Green
- D · DMC 368 Light Pistachio Green
Choose thread by its number; screen colors are an uncalibrated preview. Check the bundle for estimated amounts. You also need scissors and a hoop for the display finish; the finishing plan checks its measured opening.
Practise once, then stitch the tulip
Read three symbols
Try the small chart exercise. Blank squares stay empty, but still count when placing the next stitch.
Try the chart exercise →Place the stem
Use the centre marks of the full 32 × 40 chart. Count toward the stem before putting the first stitch in the fabric.
Practise finding the centre →Work one shape at a time
Mark only stitches you have worked. If an edge is one square out, stop and compare it with the nearest correct stitch.
Open the chart and progress marks →- Stem. Begin with the green stem below the flower and count up to the bloom.
- Left leaf. Follow the left dark leaf from its attachment toward its pointed tip.
- Right leaf. Count to the pale leaf and follow its separate right-hand edge.
- Flower body. Fill the rose-red cup, leaving the light petal cells empty.
- Light petal. Add the pink petal on the right and check the three upper flower tips.
- Final count. Compare the leaf tips and stem base with the chart, then secure tails before the hoop finish.
Lost your place? Practise undoing a miscount before carrying the error into the next shape.
Your project checklist
Tick these as you work. Checkmarks are for this visit; print the list to keep it beside your stitching.
A download or checklist does not confirm that the physical piece is finished. Our dimensions and diagrams have not been tested on an assembled sample.
Already have materials? Find a pattern that fits your cloth →