Sprig Envelope Card
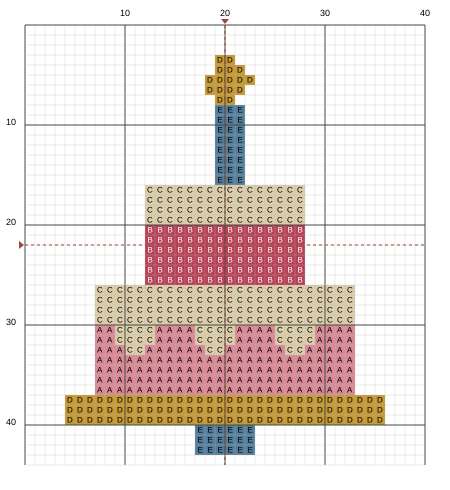
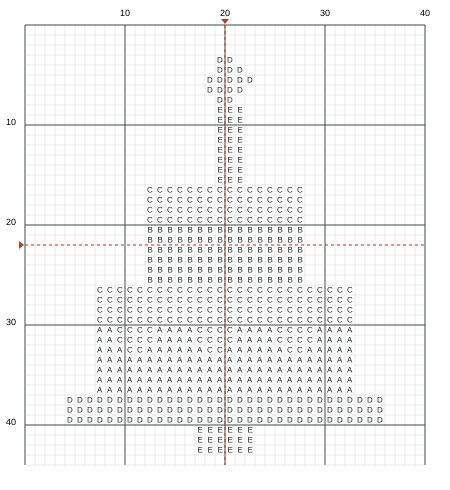
947 stitches · Full crosses only
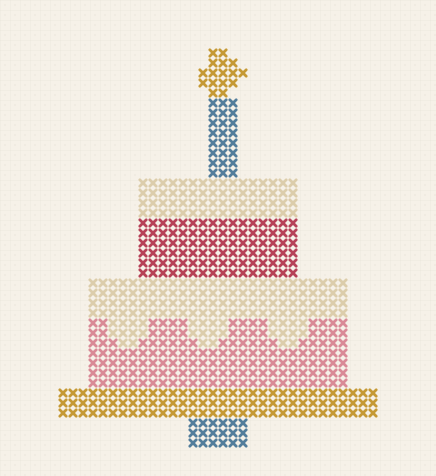
Stitch preview · simulated from the actual chart
A two-tier cake has scalloped icing, a single lit candle and a wide cake stand.
Design size
2.86 × 3.14 inCut at least 9.00 × 9.25 in of Aida
The project bundle includes the complete symbol chart, DMC thread list, stitch order and illustrated finishing plan. See the finishing steps.
Free, complete PDFs. No account needed. Your choices stay on this device.
Estimate includes 20% extra. Tension and thread travel can change usage.
| Symbol & color | Stitches | Single-strand length | Skein equivalent | Buy if needed |
|---|---|---|---|---|
| A DMC 3354 - Light Dusty Rose | 152 | 3.96 m | 0.083 | 1 skein |
| B DMC 326 - Very Dark Rose | 96 | 2.59 m | 0.054 | 1 skein |
| C DMC 712 - Cream | 198 | 5.12 m | 0.107 | 1 skein |
| D DMC 729 - Medium Old Gold | 112 | 2.93 m | 0.061 | 1 skein |
| E DMC 931 - Medium Antique Blue | 42 | 1.08 m | 0.022 | 1 skein |
A six-strand 8 m skein supplies 48 m of single strands. Use matching colors from your stash, or buy at least one skein per color. Screen colors are a guide.
Use the listed DMC Article 117 six-strand cotton numbers for this palette. Names and numbers were checked against the manufacturer list; screen swatches are illustrations, not calibrated thread colors. Compare real skeins before stitching. These projects have not been physically sample-stitched.
DMC Article 117 number and name list · 5 selected thread colors; sewing thread is separate.
Also gather a blunt tapestry needle, a hoop and scissors. Estimated stitching time: 3.8–6.7 hours at 90–160 stitches/hour. This estimate has not been timed by a stitcher.
Start with the pink lower cake, checking its width before completing the side edges.
Count the inset to the red upper tier on both sides; keep its top centered over the lower cake.
Work the ivory top icing and the lower scalloped icing, preserving each downward lobe.
Count upward to the blue candle and stitch its three-cell stem without widening it into the cake.
Add the small gold flame, wide gold stand and blue stand foot; start separate threads across the blank spaces.
Check candle alignment and the tier insets. Secure tails and use the whole chart rectangle when measuring the card aperture.
Candle Cake Card · 14 count Aida
Size a rectangular window around the whole chart, mount it from behind and cover the fabric edges.
These are measured-layout plans and original assembly diagrams. Fabric stretch, bulk, tape adhesion and the finished object have not been physically sample-tested. Make a paper dry fit and measure your actual supplies before cutting.
Diagrams are not full-size templates. Use the written dimensions and check any printer scale before tracing.
Cut a scrap-paper window 3.11 × 3.39 in. Centre it over the entire chart. The blank area inside the chart belongs to the design. Check all four sides in the same orientation as the card.
Check: The whole design and at least 0.125 in of blank cloth around it are visible. Enlarge a cramped window.
Secure tails and gently press from the back on a towel if the materials allow. Once the layout passes, trim to 4.11 × 4.39 in. This includes 0.50 in of mounting overlap beyond each side of the window.
Check: The cloth remains larger than the window; no stitched cell enters the adhesive area.
Use cardstock 9.21 × 4.89 in. Mark the halfway line at 4.61 in. Score gently with a blunt tool and fold; each closed panel measures 4.61 × 4.89 in.
Check: Fold edges meet and the hinge bends freely before a window is cut.
On the inside of the front panel, centre the 3.11 × 3.39 in window. Cut on a mat with a ruler, keeping fingers clear of the cutting line. Recheck the window with the stitched front behind it.
Check: The remaining card frame contains the full mounting overlap plus clearance to the outside edge and hinge.
Test mounting tape on a scrap first. Put narrow tape strips on the inside card frame, in the overlap area. Lay the stitching face up and lower the window onto it; align before pressing the taped margins. Keep tape and pressure off the stitches.
Check: From the front the design is centred; from the inside the raw fabric edge stays clear of the hinge.
Cut a separate cardstock cover 4.48 × 4.77 in. Centre it over the mounted cloth, leaving a narrow gap at the hinge. Tape its perimeter to the card outside the fabric, without pushing the needlework flat.
Check: The cover conceals all raw edges, and the card still closes without buckling.
Fold the back panel behind the decorated front. Let any mounting adhesive settle according to its package. If the card bows, reopen it and correct the fabric tension or thick overlap before pressing only the plain card margins.
Check: The closed card lies evenly. The cover does not catch on the hinge.
Write your message after the inside cover is secure. Place a clean sheet over the stitching for storage or an envelope. Keep the card dry; remove the fabric before any separate cleaning.
Check: No exposed sticky edge touches the stitches, envelope or message panel.
The sizing rules and diagrams above are original to this planner. These sources describe the underlying finishing techniques.